Optimising device performance requires a basic understanding of display settings to provide the best image in the prevailing conditions.
The best image will vary depending on what is required of the device. For instance, looking-out for surface debris during marine navigation requires different settings to those required for rapidly spotting animals. While experienced users will have their own preferences, new users may find the broad selection of image options a little confusing. Let’s start with the weather and ambient temperature.
Prevailing conditions
A thermal imager senses and renders an image based on the relevant temperature emitted by objects. The greater the temperature difference, the better the image. Usually, animals will be considerably warmer than their surroundings, so are easy to see. Image performance varies according to conditions.
High contrast scene
A high contrast scene has objects with sufficient heat separation to stand out from surrounding objects. This occurs during daylight, when the sun’s heat warms some objects more than others, and lasts for well after sunset when these objects slowly release their heat.
Low contrast scene
A low contrast scene occurs late at night when object temperatures have equalized, especially in the presence of dew and after rainfall. Cold air temperature increases the rate of cooling.
Visual barriers
High humidity, mist and rain are thermal barriers that degrade image quality, as is foliage that absorbs heat making warm objects difficult to see behind the foliage.
Display adjustment
Brightness and contrast are the two settings that predominantly alter an image to provide optimum viewing. High quality AMOLED displays can be adjusted to enhance image quality, while low quality displays will struggle. A display is only as good as the thermal sensor and processor that produces the signal, so consider a thermal imager as a system with interdependent components.
The following settings make a good starting point to suit prevailing conditions.
Brightness
Adjust brightness to suit light conditions, for instance, increase brightness in sunlight and reduce brightness in dimmer surroundings. Reduce brightness as much as possible at night to reduce eye fatigue and night blindness.
Contrast
Increase or reduce contrast according to the conditions. If image detail is important, use a lower contrast. A higher contrast is better for spotting animals because it increases separation between objects with lower temperatures and objects with higher temperatures.
Both brightness and contrast need to be adjusted to obtain the desired image because one setting affects the other. A little experimentation at home will pay dividends when out in the field. I usually adjust contrast first then brightness.
Polarity
These are the White-hot and Black-hot settings. White-hot displays warmer objects as brighter and is the best setting for spotting living beings, that boldly stand-out against their surroundings, which are darker due to having less heat. Black-hot renders warm objects as darker than their surroundings.
Black-hot forms an image with greater edge detail because light-spill falls into warm objects, while Whitehot spreads edge detail outwards. For this reason, military thermals are used in Black-hot mode for better object identification. In darkness however, Black-hot renders most of the image as bright, which can be a little uncomfortable. Being able to toggle between White-hot and Black-hot is a good way of spotting and identifying objects.
Colour pallets
All colours rendered in an image that is formed by light outside of the visible spectrum are pseudocolours that add colour separation to an image comprised of multiple levels of grey. Colour pallets are a personal choice based on the viewers own preference and visual needs, such as colour blindness.
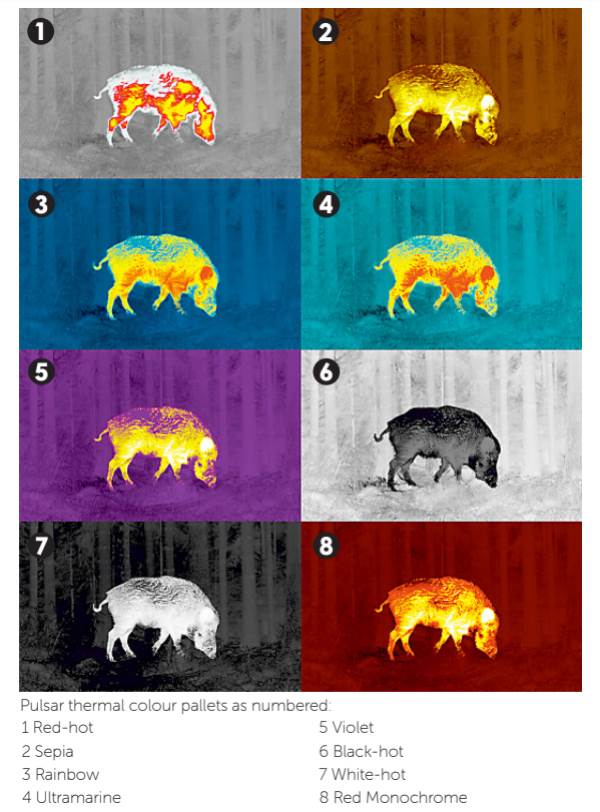
A Pulsar thermal has the following colour pallets. The emboldened settings are my favourite:
• White-hot: cool objects are dark, warm objects are light. Animals stand out more easily especially at night when the surroundings are cool.
• Black-hot: cool objects are light, warm objects are dark. Best for a clear image.
• Red-hot: same as white hot but warmer objects display red. Animals are highlighted in red that stand out well against a grey image.
• Red Monochrome: red image with warm objects displayed as
yellow. I use this in the evening because it causes less eye fatigue.
• Rainbow: from cool to hot blue, green, yellow, red.
• Ultramarine: blue image, warm objects are yellow to red.
• Violet: violet image, warm areas are yellow and white.
• Sepia: reddish brown, warm objects are yellow and white. This is my favourite setting for prolonged viewing at night with minimum eye fatigue.
Conclusion
If you are new to thermal imaging, start by experimenting with contrast and brightness in different lighting and weather conditions while observing the way these settings affect the image. Get used to accessing and changing the settings in the dark or for ease of use. One final tip that must never be overlooked is to ensure that the diopter ring on the eyepiece is correctly adjusted for a clear image. This may seem obvious, however….
For more information on thermal imaging, visit advancedoptics.nz